The Best Locations to Mount Your EV Charger in a Tight Single-Car Garage
Navigating the Spatial Challenges of EV Charging at Home
When evaluating the best locations to mount your EV charger in a tight single-car garage, especially in the 1980s and 1990s-era homes our team frequently services in Mission BC, you quickly realize that maneuvering around a thick, unwieldy charging cable is a daily frustration. You pull your vehicle in, put it in park, and immediately face an obstacle course just to reach the door leading inside the house. Routing and storing heavy cables in confined spaces often turns them into severe tripping hazards or leaves them vulnerable to being repeatedly run over by the vehicle's tires. Before our technicians drill a single hole, we emphasize that planning your layout is the first step toward better home service solutions and a safer daily routine.
Determining optimal wall placement is a critical planning step that must happen long before you book a professional installation. A well-thought-out layout maximizes your daily usability and protects the expensive charging equipment from physical damage. Because 18 to 25-foot standard EV cable lengths are incredibly common, managing that amount of heavy-duty copper wire requires strategic foresight. If you simply attach the unit to the nearest open wall space without measuring the clearance, you will likely spend the next several years stepping over a tangled cord every time you take out the recycling or carry in groceries.
Understanding the Physical Footprint in a Single-Car Space
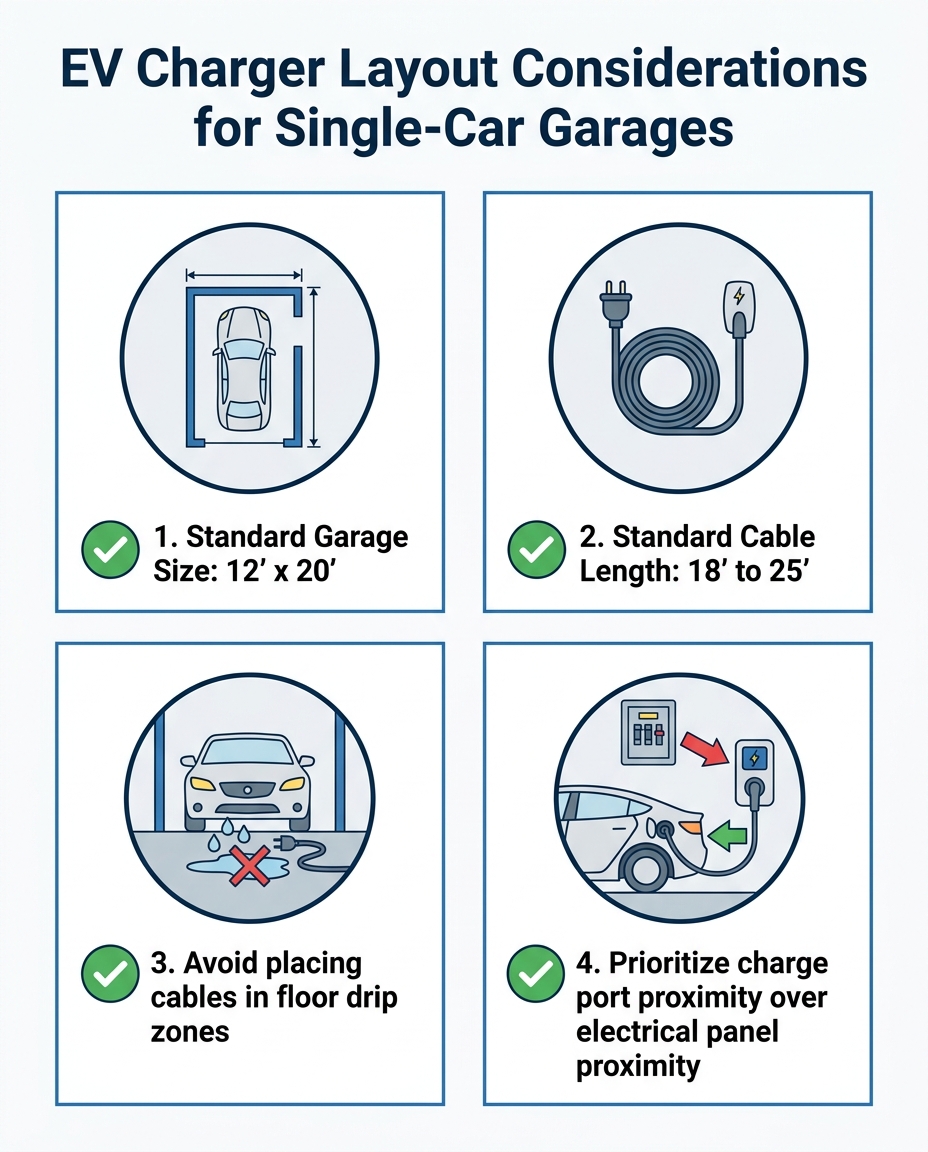
The underlying issue: When our electricians measure these spaces, we often find that standard single-car garages are typically built to a dimension of 12 by 20 feet. Once you park a modern electric SUV—like a 75-inch wide Tesla Model Y or Ford Mustang Mach-E—inside that space, the remaining square footage disappears rapidly. You are left with a narrow perimeter that must accommodate your body, your car doors swinging open, and the charging infrastructure.
The compounding factor: The physical stiffness and weight of the cable make tight coiling extremely difficult. High-amperage cables are thick and heavily insulated, meaning they naturally resist being wrapped into small, neat loops. When you combine a narrow walkway with 18 to 25-foot standard EV cable lengths, the walkable space is severely compromised. A cable left draped across the floor instantly becomes an obstacle that blocks pathways for entering the home or accessing storage shelves.
The practical solution: You must calculate the exact physical footprint of the charger and its holster before committing to a location. Reserving clear pathways requires measuring the depth of the charging unit itself. Some models protrude several inches from the wall, which can interfere with opening the car door if placed in the wrong spot.
The Walk-Around Clearance Dilemma
Calculating the remaining space between the parked vehicle and the side walls is the only way to avoid daily frustration. If a standard SUV is roughly six to seven feet wide, and the garage is twelve feet wide, you have less than three feet of clearance on either side—assuming you park perfectly in the center.
• Standard Width — Average Dimension: 12 feet — Impact on EV Charging Layout: Leaves less than 3 feet of walk-around space on either side of a standard vehicle.
• Standard Length — Average Dimension: 20 feet — Impact on EV Charging Layout: Requires careful placement to avoid blocking entry doors or front-wall storage shelves.
• Cable Footprint — Average Dimension: 18 to 25 feet — Impact on EV Charging Layout: Creates a massive tripping hazard if not properly coiled, holstered, or suspended.
Because of this limited clearance zone, wall-mounted holsters must not protrude into the primary walking path. If the charger is mounted directly next to the driver's side door, you risk striking the unit every time you exit the vehicle. Identifying a recessed area or mounting the unit slightly forward or behind the door's swing path is essential for preserving your walk-around clearance.

Why Electrical Panel Proximity Should Not Dictate Placement
A pattern we see often during our consultations is the assumption among homeowners that the charging station must be installed directly next to the electrical panel to save on conduit and wiring. While minimizing the distance between the breaker box and the charger does reduce the amount of materials used, prioritizing panel proximity often results in incredibly awkward cable routing and daily tripping hazards.
If your electrical panel is located at the back right corner of the garage, but your vehicle's charge port is located on the front left fender, mounting the charger next to the panel forces you to stretch the cable diagonally across the entire floor space. This means dragging 18 to 25-foot standard EV cable lengths over the concrete every single day, creating a permanent obstacle course. The one-time layout decision heavily outweighs minor differences in the length of a 3/4-inch rigid conduit run. You will interact with the charging cable daily, but our electricians only route the conduit once.
Instead of mapping the charger location based on the home's breaker box, map it based on the vehicle's charge port. Shifting your mindset away from the easiest installation point toward long-term usability ensures a much smoother daily routine. Once you have the ideal spot mapped out based on convenience and safety, a professional electrical installation ensures the conduit is routed safely and cleanly to meet that location, regardless of where the panel sits.
Accounting for Vehicle Drip Zones and Wet Floor Hazards
The environmental challenge: Vehicles naturally bring the outside weather indoors. During Mission BC's heavy November-to-March rainy season, we've observed that cars parked indoors will inevitably shed significant moisture onto the garage floor. Rainwater, melting slush, and winter road grime drip off the wheel wells and chassis, creating a wet drip zone directly beneath and around the vehicle.
The resulting hazard: Routing charging cables across the floor means they will frequently sit in pooling water. While charging cables are heavily insulated and designed to withstand moisture, dragging a heavy cable through winter slush and then handling it transfers that moisture directly to your hands, your clothes, and potentially the charger handle or the vehicle's port. In Mission BC residential single-car garages, where space is tight and wet weather is frequent, keeping the floor clear is a matter of both safety and cleanliness.
The elevated solution: You must elevate the cable path to keep all electrical components clean and dry. By routing the cable along the wall or suspending it from above, you completely avoid the drip zone. Elevating the cable prevents it from sitting in corrosive road salts and freezing water, which can degrade the outer sheathing over time. Keeping the cord off the ground also ensures that when you coil it back up, your hands stay clean.
Overhead Cable Routing Strategies to Keep Walkways Clear
If wall space is entirely consumed by shelving or doors, our technicians highly recommend introducing advanced space-saving techniques. Ceiling-mounted cable retractors offer a brilliant solution for managing long cables in cramped environments, keeping cords off the ground entirely. When we evaluate a garage for an overhead system, we focus on a few key design principles:
1. Measuring the total reach required: We determine the exact distance from the ceiling center point to the vehicle's charge port, ensuring the 18 to 25-foot standard EV cable lengths have enough slack to reach without pulling tight.
2. Utilizing a ceiling retractor system: These systems use a spring-loaded tether to suspend the charging cable from the ceiling. When you need to charge, you simply pull the handle down; when finished, the retractor pulls the slack back up toward the ceiling.
3. Routing the cable away from paint: Overhead routing prevents the heavy cable from dragging across the floor, but it also prevents it from rubbing against the vehicle's paint. A suspended cable drops directly down to the port, eliminating side-chafing against the fenders.
4. Securing the path against tension: Our installers ensure the overhead system does not put undue upward tension on the charging handle while it is plugged in, which could damage the vehicle's port over time.
Evaluating Ceiling Height and Retractor Placement
Before committing to an overhead strategy, assess whether your standard 9-foot garage ceiling is high enough to support a retractor. You must guarantee that the suspended cable and the retractor box do not interfere with the garage door track or the door itself when it opens. Determine a center point that allows the cable to drop cleanly to the vehicle without hanging so low that you hit your head on it when walking past.
Aligning the Charging Station with Your Vehicle's Charge Port
In our experience, matching the charger location to the specific vehicle design is vital because not all electric vehicles are built the same. Identifying the common charge port locations on modern EVs is your first task. For example, a Nissan Leaf features the port on the front grille, a Rivian R1S has it on the driver's side front fender, and many Tesla models place it on the driver's side rear quarter panel.
If your port is on the rear quarter panel, mounting the charger near the garage door is often the best choice. If the port is on the front grille, mounting the charger deep in the garage near the back wall makes more sense. The implications of backing a vehicle into a tight space just to reach a poorly placed charger are significant. Reversing into Mission BC residential single-car garages requires precision, especially in wet or dark conditions, and forcing yourself to do it daily simply because the charger was installed on the wrong wall is a massive inconvenience.
The string test: To avoid this mistake, we advise creating a mock layout using a piece of string or rope cut to the exact length of your charger's cable. Tape one end to your proposed wall location and physically walk the other end to your vehicle's charge port. This simulation instantly reveals if the cable will drape over the hood, block a walkway, or pull too tightly to connect comfortably.
Partnering with a Certified Electrician for Safe Installation
The planning phase vs. execution phase: While mapping out the physical layout, measuring clearances, and performing the string test are entirely homeowner tasks, the actual installation of the charging equipment requires licensed professionals. Moving from DIY layout planning to professional execution is a non-negotiable transition.
The code compliance factor: Proper conduit routing through a tight garage must adhere strictly to local electrical codes. The physical location you choose dictates how the conduit must be bent, secured, and protected from physical damage. Furthermore, our team sees a distinct difference in spatial requirements between installing a NEMA 14-50 plug-in receptacle (which requires a specific outlet box and precise mounting heights) and a 48-amp hardwired unit (which offers a slightly cleaner profile against the wall).
The professional guarantee: An expert assessment ensures the chosen location is both highly functional and structurally safe. At Rep-Air Heating and Cooling, our Red Seal certified electrical expertise guarantees safe, code-compliant installations that protect the vehicle and property, avoiding the severe risks of amateur electrical work. By relying on our Langley electrical services, you ensure that the heavy continuous electrical load is managed safely within your home's infrastructure, no matter how tight the physical space in Mission BC residential single-car garages might be.
Frequently Asked Questions About Garage EV Charger Layouts
While planning the physical layout is your first step, choosing the right equipment is just as critical. If you are comparing your hardware options, reviewing the differences between hardwired vs plug-in EV chargers can help clarify your space requirements. Here are the most common questions homeowners ask our technicians about spatial planning and safety.
Where is the best place to put an EV charger in a small garage?
The optimal location is on the wall closest to your vehicle's charge port, placed in an area that does not obstruct the driver's side door from opening. You want to minimize the distance the cable has to travel while ensuring the physical unit does not protrude into your main walking path. Testing the location with a string before our electricians arrive ensures the spot is truly functional.
How do you manage an EV charging cable to avoid tripping?
Keeping the cable elevated is the most effective way to prevent tripping hazards. You can use a wall-mounted cable holster to tightly coil the cord when not in use, or have an overhead retractor system installed to suspend the cable from the ceiling. Never leave the cable lying loose on the garage floor where it can be stepped on or run over.
Should an EV charger be mounted near the garage door?
Mounting the charger near the garage door is highly recommended if your vehicle's charge port is located on the rear quarter panel and you prefer to park nose-in. This placement keeps the cable run short and prevents it from stretching across the entire length of the vehicle. However, our installers always ensure the unit is mounted far enough away from the garage door tracks to avoid mechanical interference.
Can you mount an EV charger on the ceiling to save space?
While the heavy charging unit itself must typically be mounted to a solid wall stud to support its weight and meet electrical codes, the cable management system can absolutely be ceiling-mounted. Ceiling retractors are excellent for tight spaces because they drop the charging handle directly down to the vehicle port. Always consult an electrician to ensure the overhead routing meets safety standards.
How far can an EV charger be installed from the electrical panel?
An EV charger can be installed virtually anywhere in the garage, provided a professional electrician can safely route the appropriately sized conduit and wiring to that location. While longer runs require more materials and labor, prioritizing a location that makes daily charging easy is much more important than keeping the unit right next to the breaker box.
What is the best way to keep charging cables out of winter slush on the garage floor?
The best method is to utilize a wall-mounted hook or an overhead suspension system that keeps the cable entirely off the ground during the charging process. Because vehicles drag in melting snow and rainwater, elevating the cord prevents it from sitting in corrosive puddles. This protects the cable's insulation and keeps your hands clean when you unplug the vehicle.
Finalizing Your Garage Layout for a Seamless Charging Experience
At Rep-Air Heating and Cooling, we find that prioritizing daily usability over electrical panel proximity consistently yields the best long-term results for homeowners. By carefully measuring your walk-around clearance and keeping heavy cables organized and off the floor, you protect your expensive charging equipment and prevent daily accidents. In tight spaces like Mission BC residential single-car garages, thoughtful spatial planning is just as important as the electrical capacity.
Take the time to create a mock layout, test the cable reach, and identify the safest wall for your specific vehicle. Once you have finalized your preferred layout, consult our licensed professionals to bring the plan to life safely, ensuring your daily charging routine is smooth, organized, and perfectly suited to your space.
hear what our satisfied clients have to say
Neighbourhoods in the Fraser Valley