
How to Troubleshoot AC Issues Quickly Before Calling a Pro
AC Troubleshooting Tips Before Calling a Pro: Quick Fixes Most Homeowners Can Do Today
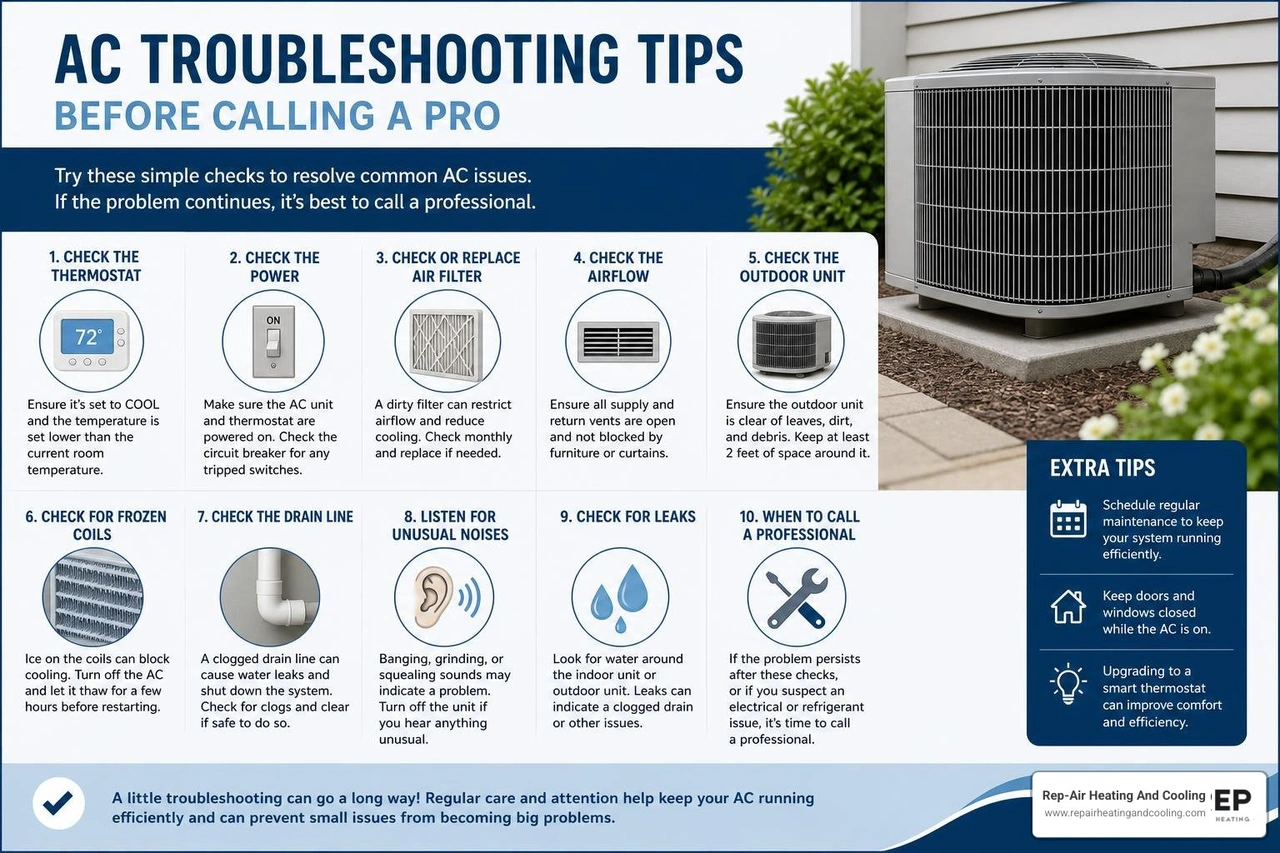
The best ac troubleshooting tips before calling a pro can save you time, stress, and an unnecessary service call — especially when summer heat hits hard across the Lower Mainland. Before you pick up the phone, there are several simple checks you can run in about 10 minutes that resolve the majority of common AC problems.
Here is a quick-reference list to address the most common issues right away:
1. Check your thermostat — Make sure it is set to COOL mode and the temperature is set at least 3–5°F below the current room temperature. Replace batteries if the display is blank or dim.
2. Inspect your air filter — Hold it up to a light source. If little to no light passes through, replace it. A clogged filter is the single most common cause of AC problems.
3. Reset the circuit breaker — Go to your electrical panel, flip the AC breaker fully OFF, wait 30 seconds, then turn it back ON.
4. Check vents and registers — Make sure all supply and return vents are open and not blocked by furniture or curtains.
5. Inspect the outdoor unit — Clear away leaves, grass clippings, or debris. Make sure there is at least 2–3 feet of clearance on all sides.
6. Perform a system reset — Turn the thermostat off, switch the breaker off, wait 5 minutes, then restore power and restart.
7. Look for ice on the coils — If you see frost or ice on the indoor unit, turn the system off and set the fan to ON to allow it to thaw before restarting.
Research consistently shows that nine out of ten central AC problems trace back to simple issues like a dirty filter, a tripped breaker, or an incorrect thermostat setting. That means most homeowners can resolve the problem themselves — without waiting for a technician.
That said, some issues do require a licensed HVAC professional. Refrigerant leaks, repeated breaker trips, strange grinding noises, or a system that still won't cool after basic checks are all signs it is time to call in an expert.
This guide walks you through each step in plain language so you can troubleshoot confidently, protect your equipment, and know exactly when to stop and call for help.

Essential AC Troubleshooting Tips Before Calling a Pro
When your home starts feeling more like a greenhouse than a comfortable sanctuary, it is easy to assume the worst. However, before you brace yourself for a major repair, running through a systematic diagnostic process is incredibly valuable. Many common cooling issues can be traced back to restriction of airflow or minor electrical interruptions.
Understanding how these elements interact can prevent you from spending money on a basic service call. If your system is running but failing to lower the temperature, or if it is blowing air that feels lukewarm, starting with the basics is always the smartest move. For a deeper dive into these common performance issues, check out our guide on AC Not Cooling: Common Problems and Solutions.
If your system is actively blowing air but it simply is not cold, you are likely dealing with a localized restriction or a simple settings error. Taking the time to evaluate your system systematically can restore your comfort in minutes. If you find yourself dealing with this specific issue, you can find a step-by-step breakdown in our article on AC Blowing Warm Air: 5 Essential Fixes.
Thermostat Settings and Battery Issues
It might sound overly simple, but the thermostat is the brain of your entire HVAC system, and it is frequently the source of "broken" air conditioners. Many service calls are resolved simply by correcting a setting that was accidentally changed by a family member or bumped during cleaning.
First, verify that the system is set to "Cool" and not "Heat" or "Fan Only." If the fan is set to "On," the blower will run continuously even when the system is not actively cooling, which can make the air coming out of your vents feel warm. Switching the fan setting to "Auto" ensures the blower only runs when the system is actively chilling the air.
Next, check the target temperature. It should be set at least 3 to 5 degrees below the current room temperature to trigger the system to start. If your thermostat has a digital display that is blank, flashing, or dim, the batteries are likely dying. Most programmable and smart thermostats require fresh batteries every 12 months. If the batteries die completely, the thermostat cannot send the signal to your air conditioner to turn on.
Additionally, avoid setting your thermostat below 70°F (21°C) in an attempt to cool the house faster. It won't speed up the process, but it can easily freeze your indoor evaporator coils, shutting the whole system down. For more helpful seasonal advice on managing your system in the Lower Mainland, read our AC Tips This Summer Mission, BC Air Conditioners guide.
Inspecting and Replacing Your Air Filter
A dirty air filter is the single most common cause of HVAC issues. When a filter becomes packed with dust, pet dander, and household debris, it creates a severe airflow restriction. Your air conditioner relies on a steady stream of warm indoor air passing over the cold evaporator coils to absorb heat. When that airflow is choked off, the cold coils cannot transfer their cooling energy to your home.
This lack of airflow causes two major problems:
• Frozen Evaporator Coils: The moisture that naturally condenses on the coils freezes solid, turning your indoor unit into a block of ice and blocking all airflow.
• System Overheating: The blower motor has to work twice as hard to pull air through a clogged filter, which can cause it to overheat and trip your system's internal safety limits, shutting the AC down completely.
To inspect your filter, turn your system off at the thermostat, slide the filter out of its slot, and hold it up to a nearby light source. If you cannot see light passing through the fibers, it is ready for the trash.
When choosing a replacement, pay attention to the Minimum Efficiency Reporting Value (MERV) rating. For most residential systems in British Columbia, filters rated between MERV 8 and MERV 11 offer the perfect balance of air filtration without restricting airflow. Avoid using MERV 13 or higher filters unless your system was specifically designed for them, as these dense filters can actually starve your system of air and cause the exact same freezing issues as a dirty filter.
Checking Vents and Registers for Blockages
For your air conditioner to maintain a comfortable, balanced temperature, air must be able to flow freely into and out of every room. This requires clear pathways through both your supply vents (which blow cold air in) and your return registers (which pull warm air back to the system).
It is common for homeowners to rearrange furniture for the summer, inadvertently placing a couch, a heavy rug, or a filing cabinet directly over a vent. When vents are blocked, it disrupts the airflow balance of the entire house.
Some homeowners also close vents in unused rooms, believing it will save energy by redirecting cold air to active areas of the home. In reality, modern ducted HVAC systems are designed to operate under specific pressure levels. Closing more than 10% to 15% of your vents builds up excessive static pressure within the ductwork. This strain can cause air leaks, damage your blower motor, and reduce overall cooling efficiency.
Keep all supply and return vents fully open and clear of obstructions, maintaining at least a two-foot clearance around them. To learn more about how improper airflow layouts and placement can impact your home comfort, check out AC Placement Mistakes to Avoid Making for New Units.
Checking Electrical Panels and Outdoor Condenser Units
If your thermostat settings are correct and your air filters are clean, but the system still refuse to kick on, the issue is likely electrical or centered around the outdoor condenser unit. Your central air conditioner actually runs on two separate electrical circuits: one for the indoor air handler and another for the outdoor condenser. This means your indoor fan might be blowing warm air even though the outdoor unit has lost power completely.
Before assuming a mechanical part has failed, it is essential to check your electrical panel and the physical condition of your outdoor unit. For a comprehensive look at what happens when your outdoor unit loses power, read our detailed guide on AC Circuit Breaker Keeps Tripping What It Means.
How to Safely Reset a Tripped Circuit Breaker
During hot summer afternoons in the Lower Mainland, your air conditioner draws a significant amount of electricity to keep your home cool. If there is a minor power surge or if the system experiences a temporary overload, the circuit breaker in your main electrical panel may trip to protect your home from electrical damage.
To safely check and reset your AC breaker, follow these steps:
1. Turn off the thermostat: Go to your thermostat and set it to the "OFF" position. This prevents the system from immediately trying to start up and drawing a massive electrical load the moment you restore power.
2. Locate your electrical panel: Open the panel door and look for the breakers labeled "AC," "Air Conditioner," or "HP" (Heat Pump).
3. Identify the tripped breaker: A tripped breaker is usually not fully in the "ON" or "OFF" position; instead, it will be resting somewhere in the middle, often showing a small red indicator.
4. Reset the breaker: To reset it, you must flip the switch completely to the "OFF" position first until you hear a distinct click. Wait about 30 seconds, then flip it firmly back to the "ON" position.
5. Turn the thermostat back on: Return to your thermostat and switch it back to "COOL."
If the breaker immediately trips again, do not attempt to reset it a second time. A breaker that trips repeatedly is a clear warning sign of a serious underlying issue, such as a failing compressor, a short circuit, or a bad start capacitor. Continuing to force the breaker back on can cause severe damage to your system's electrical components or even present a fire hazard. If you find yourself in this situation, refer to our article on what to do when your AC Breaker Keeps Tripping.
Clearing Debris and Maintaining the Outdoor Unit
Your outdoor condenser unit is responsible for releasing the heat absorbed from inside your home into the outdoor air. To do this effectively, the metal coils and delicate aluminum fins surrounding the unit must have an unobstructed path for airflow. Over time, wind, lawn mowing, and nearby garden beds can clog the condenser fins with leaves, grass clippings, dirt, and cottonwood seeds.
When the outdoor unit is choked by debris, it cannot release heat efficiently. This causes the system's operating temperature and pressure to spike, forcing the compressor to run hotter and consume significantly more energy. Over time, this lack of heat transfer can cause the compressor to overheat and shut down prematurely.
To maintain your outdoor unit safely:
• Turn off the power: Locate the outdoor disconnect box (usually mounted on the wall of your house near the unit) and pull the disconnect plug or flip the switch to "OFF."
• Clear vegetation: Trim back any bushes, shrubs, or tall grass to maintain at least a 2-to-3-foot clear radius around the sides of the unit, and ensure there is at least 5 feet of clear space above it.
• Remove loose debris: Gently clear away any leaves, twigs, or weeds from the base of the unit by hand.
• Rinse the coils: Using a garden hose with a gentle spray nozzle, rinse the metal coils from the top down to wash away accumulated dust and dirt. Never use a pressure washer, as the high-pressure stream will instantly bend and damage the delicate aluminum fins, permanently restricting airflow.
Performing a System Reset on Your AC Unit
Just like a computer or a modern smartphone, your air conditioner's internal control boards can occasionally experience a temporary software glitch or communication error. This is especially common after a local power outage, a brownout, or a sudden power surge. Performing a full system reset — often referred to as a "power cycle" — can clear these minor errors and allow the system to reboot successfully.
The safest and most effective way to reset your central AC is using the five-minute rule:
1. Shut down at the thermostat: Turn your thermostat to the "OFF" position.
2. Cut the power at the source: Go to your main electrical panel and flip both the indoor air handler breaker and the outdoor condenser breaker to "OFF."
3. Disconnect the outdoor unit: If you feel comfortable doing so, switch the outdoor disconnect box near your condenser to "OFF" as well.
4. Wait patiently: Leave the power completely disconnected for at least 5 to 10 minutes. This allows any residual electrical charge in the system's capacitors to dissipate fully, clearing the system's memory.
5. Restore power in order: Turn the outdoor disconnect back on, flip the circuit breakers in your main panel back to "ON," and then return to your thermostat.
6. Set to Cool: Switch your thermostat back to "COOL" and lower the temperature setting. That most modern AC systems have a built-in delay of 3 to 5 minutes before the compressor kicks on to prevent short-cycling, so don't panic if it doesn't start instantly.
When to Stop DIY and Call a Professional HVAC Technician
While running through basic troubleshooting steps is an excellent way to rule out simple fixes, it is equally important to recognize when a problem is beyond the scope of safe DIY repair. Modern air conditioners are complex systems that combine high-voltage electricity, delicate electronic controls, and high-pressure chemical refrigerants.
Attempting to handle these components without the proper diagnostic tools, safety gear, and specialized training can result in severe personal injury, costly damage to your system, or voiding your equipment warranty. If you have completed the basic steps — verified the thermostat, replaced the filter, checked the breakers, and cleared the outdoor unit — and your home is still warm, it is time to step back. To help you evaluate your system's condition, read our guide on Signs Your AC Needs Repair.
Warning Signs of Serious AC Problems
There are several clear warning signs that indicate your air conditioner is experiencing a major mechanical or electrical failure that requires immediate professional intervention:
• Frozen Evaporator Coils: If you notice ice forming on the copper refrigerant lines leading into your indoor air handler, or if your indoor unit is physically dripping water onto your floor, your system is freezing up. Turn the system completely OFF immediately and set the fan to "ON." This allows the ice to melt without running the compressor, which can be ruined if forced to run while frozen. Once thawed, a professional must diagnose the root cause, which is often a low refrigerant charge or a failing blower motor. If your indoor unit is actively pooling water, refer to our troubleshooting guide for an AC Unit Is Leaking Indoors.
• Refrigerant Leaks: Your air conditioner's refrigerant operates in a closed loop; it should never run low or need to be "topped up" under normal conditions. If your system is low on refrigerant, it means there is a physical leak in the copper lines. Warning signs include a persistent hissing or bubbling sound from the indoor or outdoor unit, long run times with little to no cooling, and a low temperature split (less than 10°F difference between supply and return air). Never attempt to handle or recharge refrigerant yourself. Handling refrigerant requires specialized EPA certification by law, and DIY attempts can easily destroy your compressor.
• Strange or Unusual Noises: While a healthy AC should operate with a gentle hum and the sound of rushing air, loud or sudden noises are a cry for help. Squealing, grinding, clanging, or loud metal-on-metal banging noises indicate a failing blower motor, loose fan blades, or an distressed compressor. Turn the system off immediately to prevent further physical damage and consult our guide on AC Making Strange Noises: What They Mean.
Why Professional Maintenance Prevents Common Breakdowns
The easiest way to deal with an air conditioning breakdown is to prevent it from happening in the first place. Just like your car requires regular oil changes and tire rotations to keep running smoothly, your home's cooling system requires professional preventative maintenance.
Most HVAC systems have a total lifespan of 15 to 20 years, but without regular care, frequent minor breakdowns often begin around year 12, accompanied by a steady drop in energy efficiency.
During an annual professional spring tune-up, a qualified technician will perform a comprehensive multi-point inspection that goes far beyond what a homeowner can safely do:
• Electrical Diagnostics: Measuring the electrical draw (amps) of your compressor and fan motors, and testing start capacitors to catch weak components before they fail on a hot afternoon.
• Refrigerant Level Verification: Checking system pressures to ensure your refrigerant charge is exact, maximizing cooling capacity and efficiency.
• Deep Coil Cleaning: Professionally cleaning both the indoor evaporator coil and the outdoor condenser coil, which can restore lost cooling capacity and lower your monthly energy bills.
• Condensate Line Flushing: Clearing algae, mold, and debris from the drain lines to prevent water damage and indoor leaks.
Regular maintenance not only keeps your home consistently comfortable but also preserves your manufacturer's warranty, which often requires annual professional service records to remain valid. If you are experiencing weak airflow or warm air in the Fraser Valley, read our local troubleshooting guide for AC Not Blowing Cold Air Mission, BC HVAC Troubleshooting.
Frequently Asked Questions About AC Troubleshooting
What are the best ac troubleshooting tips before calling a pro for a system blowing warm air?
If your air conditioner is running but blowing warm air, start by checking your thermostat settings to ensure it is set to "COOL" and "AUTO" rather than "FAN ONLY." Next, inspect your air filter and replace it if it is dirty, as restricted airflow can cause the indoor coils to freeze, blocking cold air. Finally, go outside and verify that the outdoor condenser unit is getting power and that the fan is spinning. If the outdoor unit is completely silent while the indoor fan is blowing, check your main electrical panel for a tripped breaker.
How often should I replace my air filter in 2026?
In 2026, the recommended replacement schedule depends primarily on the thickness of your filter, as well as household factors like pets, allergies, and local air quality.
• 1-inch Filter — Recommended Replacement Frequency: Every 30 to 60 days (or monthly if you have pets/allergies)
• 2-inch Filter — Recommended Replacement Frequency: Every 3 months
• 4 to 5-inch Media Filter — Recommended Replacement Frequency: Every 6 to 12 months
Regularly replacing your filter is the simplest and most effective way to maintain high energy efficiency and protect your blower motor from premature wear.
What are the top ac troubleshooting tips before calling a pro when the unit won't turn on?
If your AC won't turn on at all, first check your thermostat batteries and replace them if the display is blank or dim. Next, inspect your home's main electrical panel for a tripped circuit breaker, as well as the outdoor disconnect switch near your condenser unit to ensure it hasn't been turned off. Finally, check your indoor air handler's condensate drain pan. If the drain line is clogged with algae or debris, the water level will rise and trip the safety float switch, which automatically cuts all power to the system to prevent water damage in your home.
Conclusion
Taking a few minutes to run through basic AC troubleshooting steps can save you from a stressful afternoon and an unnecessary service charge. By understanding how simple factors like thermostat settings, dirty air filters, and blocked vents impact your system's performance, you can keep your home comfortable and running efficiently all summer long.
However, when DIY troubleshooting reaches its limits, or if you are facing complex electrical issues, frozen coils, or suspected refrigerant leaks, you need a team you can trust.
At Rep-Air Heating And Cooling, we pride ourselves on treating our customers like family, offering unmatched customer service, and providing comprehensive preventative maintenance plans. We proudly serve homeowners throughout the Lower Mainland, including Abbotsford, Mission, Maple Ridge, Surrey, Chilliwack, and Langley.
If your air conditioner is still acting up after running through these checks, don't sweat it! Contact us today to schedule your professional service on our Air Conditioning Service Page and let our expert technicians restore your peace of mind and home comfort.
hear what our satisfied clients have to say
Neighbourhoods in the Fraser Valley
